Final Reflection

I fully expected to learn a lot during this course, but I had no idea how much fun Digital Technology would be and how it would push my self-made boundaries to their limit and beyond.  Before this class I had completed exactly one podcast and belonged to Facebook and Twitter, but that’s about it.  Everything else was new to me.  Almost every week we were challenged to try something different, and I found myself learning about and using technologies that I had only heard of.  Screencasts, infographics, and their like were for people who knew a lot more about digital technology than I did, right?  Well, this course proved me wrong.  I not only learned how to create QR codes and book trailers, but I made my first Vine, and I even set up a blog reader so I could keep track of my favorite blogs—all things I’ve meant to take the time to learn, but now I know decently well.

The most exciting technology I worked with this semester is also the one I think students will most benefit from: screencasts.  I have wanted to learn how to create screencasts for a couple of years now, and I’m so glad to have finally had the opportunity to stop thinking about it and start doing.  What I found exciting is the reaction from my colleagues as I shared around my Formatting an MLA Works Cited Page in Google Docs screencast.  They were impressed, which is nice, but they showed the video to their students, which is wonderful!  While screencasting isn’t flashy like some of the other technologies, the educational aspect of it can’t be ignored for its usefulness in the classroom and beyond those walls.  Students can view these before class as part of a flipped classroom lesson, they can view them during class to attend to instruction at their own pace, and they can see them outside of class if they are absent.  These are all huge positives for students and a good learning outcome.

As far as difficulty goes, I would have to say infographics were the most difficult for me, if only for finding the best way to convey my message and wanting to keep the clean, uncluttered look of infographics I have enjoyed in the past.  While I found these the most challenging, they are also turning out to be highly useful as I am working on building my own infographic resume to take along or send ahead to job interviews.

Overall, this course has made a huge impact on my willingness to try new technologies instead of going with the old tried and true methods.  I’m excited to have opportunities in the future to share this knowledge with others, and I’ve already set myself up to take professional development classes this summer involving even more digital tools to help continue my own learning.  I’ve definitely been inspired, and I don’t want to lose this momentum.

Media (is) the Message?

In 1983, a gentleman by the name of Richard Clark shared his views on “the range of educational media, from textbooks to computer-based instruction” (Mellon 1999), and made the comparison between media and delivery trucks, thus beginning what is now known as the delivery truck debate.  Clark’s basic contention seems to be that media happens to be nothing more than a delivery method for education, and one that can be typically duplicated by other, less expensive means.

In 1994, Robert Kozma chose to revisit the debate, hoping to reframe the question as “Do media influence learning?” (Media 2012).  Kozma’s direction in this debate assumes “that learning with media is a complementary process,” and we need to change the way we look at media if our ultimate goal is to improve teaching and learning.

Reading their views, I found myself in an interesting place.  I happen to love using technology in my classroom, and I fully intend to take advantage of it as often as possible in my future library.  But I also believe that in education we sometimes use technology for the sake of technology, assuming that its use will be better than not using it, even when the alternative is cheaper and easier to deploy.  As stated in the article “Technology and the Great Pendulum of Education,” “There seems to be an assumption in many educational settings that the mere presence of technology–or more specifically, computers–implies learning” (Mellon 1999).  Mellon goes on to remind us that there are two other sides of this equation that seem to be left out of the delivery truck debate—the teacher and the student.  Students have different learning modalities, and teachers have their own, individual approach to this in the classroom.  We can hand one piece of technology to a teacher, and they will run with it; their class will show immediate benefits, and everyone is thrilled.  If we hand that same piece of technology to a different teacher, one who either isn’t fully trained, or isn’t comfortable with the technology, the results could be drastically different.  The same goes for students; different learning styles require different educational methods.  As Mellon (1999) states, “[I]t is this interplay of learning style, motivation, and prior experience that will determine learning.”

I find myself definitely preferring Kozma’s argument because I firmly believe that technology can and should improve teaching and learning, but without training and guidance for implementation, that same technology is truly the equivalent of Clark’s delivery truck—if a student happens to have learned from it, the media itself is less responsible for the learning outcome than the independently learning student.


Resources:

The media debate. (2012, August 30). Retrieved April 15, 2016, from http://edutechwiki.unige.ch/en/The_media_debate

Mellon, C. A. (1999). Technology and the great pendulum of education. Journal Of Research On Computing In Education, 32(1), 28.

Podcasts

Podcasts are one of those things I listen to, but I rarely consider creating on my own.  The main reason for this is that until reading up on the use of podcasts for educational purposes, I didn’t think I had anything to add to the conversation.  So, this challenge was all about helping me transition from being mainly a consumer of podcasts to becoming someone who creates them and shows others how simple it is to make their own.

As far as the use of podcasts in the classroom and/or library, while reading I compiled a list of some of my favorite suggestions for their use.

Podcasting 101 for K–12 Librarians,” written by Esther Eash offered these terrific ideas:

  • walking library-orientation podcast
  • oral history research
  • supplement curricular needs
  • get news and information for research
  • Promoting the library
  • Using student products to share learning
  • Sharing school news
  • Providing professional development “on-demand tutorials, copyright discussions, book group discussion guides, overviews of new services or policies, presentations by outside professionals, or introductory discussions of educational issues” (Eash 2006).

KidsCast: Exciting Podcasting Activities to Promote Research and Learning” written by Wesley Fryer added even more suggestions:

  • Podcast Dramas: “Create old time radio dramas tie them to concepts that you are studying” (Fryer 2006)
  • Poetry slam: students create their original poems and then record them with dramatic interpretation
  • Today in history: “assign students a day each month look for historical events on their date research context, events, and implications” (Fryer 2006)
  • Book talks
  • Spelling bee: “publish weekly spelling lists as a podcast (spoken, spelled, used in a sentence)” (Fryer 2006)

And while you are reading up on podcasts in education, make sure to check out the Related Resources at the bottom of ReadWriteThink’s strategy guide “Teaching with Podcasts” (Gardner).  The resources provide lesson plans for elementary on up with all sorts of creative ways to use podcasting to enhance learning.

After reading, I played around with, and either recorded directly or uploaded files to, several different podcasting sites: Soundcloud, AudioBoom, and PodOmatic.  I found all three fairly easy to maneuver through, and they each offered free memberships with the opportunity to upgrade to access far more options.

Soundcloud

My first podcast attempt was with Soundcloud.  I was pleasantly surprised at how easy it was to set up my account and proceed directly to recording.  Within two clicks I was at the recording page, ready to go.  I did a 10-second trial run that worked flawlessly, and went ahead and began recording.  For no easily discernible reason, this is where the ease of use ended for me.  I recorded the book talk I had chosen and began uploading my recording.  While it was uploading, I proceeded to add a title and description, but as I was adding in tags, there was an error message saying my recording didn’t upload properly.  I checked, and while it showed as being uploaded, there was no sound.  I recorded the book talk three more times, and each one failed, but I finally realized the recording only failed when I tried to add tags to make it easier to find.  Not adding tags was a simple solution, and the last recording uploaded without a hitch.

Here is Installation One: Mrs. A’s Favorite Reads of 2015-2016

https://soundcloud.com/andria-amodt-ho/installationone

AudioBoom

AudioBoom, formerly Audioboo, is one of those incredibly friendly looking sites with a lot of content available on the Home page.  I felt a bit overwhelmed at first, but sign-up was fast and easy, and I was looking around the site within minutes.  I’ll admit to having a bit of a panic moment when I couldn’t find anything leading me to where to record or upload files, though.  I clicked the dropdown menu beneath More, and there was a Getting Started link, but that only took me to the option to upgrade my account.  I had to click on Help and Feedback to figure out where to go.  I felt a bit foolish when I realized the red circle at the top right of the page was for recording.  There wasn’t anything marking it as such, and unless you hover over it with your mouse, it isn’t clear.  Thank goodness everything else about recording with them was clear.  My test recording went smoothly, as did recording my second book talk.  Within a minute of finishing my podcast, I could listen to, share, or embed it wherever I wanted.

Here is Installation Two: Mrs. A’s Favorite Reads of 2015-2016

https://audioboom.com/boos/4410455-installation-two-mrs-a-s-favorite-reads-of-2015-2016.embed

PodOmatic

PodOmatic was the last site I worked with, and it was definitely different from the previous two.  For one, you don’t record directly to their site—you upload your files.  This wasn’t a big deal because it gave me an excuse to try a couple of different things such as Audacity and my new USB microphone instead of the headset with a built-in microphone that I used with the others.  It did take me a few minutes and following a tutorial to figure out Audacity, but in reality, for basic podcasting it wasn’t all that different from the others I had already used.  It was simple to upload my file to the site, and there was even the possibility to add pictures to personalize or help promote the podcast.  Thanks to PodOmatic, I also discovered that there is a huge sound quality difference between using the headset to record and using the freestanding USB microphone.  The USB mic was definitely superior, and I will definitely be using it more in the future.

Here is Installation Three: Mrs. A’s Favorite Reads of 2015-2016

http://andriaamodtho.podomatic.com

My recommendation

After using the three different podcasting sites, for student use I would lean toward AudioBoom.  It was definitely the easiest to record with, and there was no confusion afterwards about how to share or embed my work.  This would definitely translate best with students.  For myself, I do want to go back and see how well the site handles uploading of previously recorded and saved podcasts, but all indications show this will be handled as smoothly as the rest of the process.

Overall, this turned out to be a lot of fun, and I can definitely see the benefits of podcasting in both the classroom and my future library.  My plan with the three I created for this assignment is to take them back to the library I’m interning in right now, make QR codes to go with them, print them out, and place them up as shelf talkers.  These were so easy to create that I’m thinking our school’s book club will want to be part of the fun as well.

Resources:

Eash, E. K. (2006, April). Podcasting 101 for K–12 Librarians. Retrieved April 09, 2016, from http://www.infotoday.com/cilmag/apr06/Eash.shtml

Fryer, W. A. (2006). KidsCast: Exciting Podcasting Activities to Promote Research and Learning. Retrieved April 09, 2016, from http://www.speedofcreativity.org/2006/09/01/kidscast-exciting-podcasting-activities-to-promote-research-and-learning/

Gardner, T. (n.d.). Teaching With Podcasts – ReadWriteThink. Retrieved April 09, 2016, from http://www.readwritethink.org/professional-development/strategy-guides/teaching-with-podcasts-30109.html

Cartoons and Comics

I remember the rush every Sunday morning to be the first to get to the Sunday newspaper.  Sunday’s paper meant Sunday funnies, and they would be in color!  Those comic strips were a huge part of my growing up, and I remember my siblings and I trying to imitate the drawing style of our favorite artists.  Unfortunately for me, it became quickly apparent that I have roughly no talent when it comes to drawing, so creating a comic strip of my own was definitely out of the running for a future career choice.  For those of us who really can’t draw, all is no longer lost.  There are many comic strip creation sites and apps available now, and they run the gamut from being easy enough to turn a pre-K class loose to something high school students could use to fulfill their creative needs.  This week I worked with ToonDoo, Pixton, and MakeBeliefsComix.

ToonDoo

From the first introduction screen, you can tell ToonDoo was designed to catch the attention of the younger grades.  It is bright, fun, and full of cute, cartoony creations.  I found it fairly straightforward to navigate, and there were lots of choices for backgrounds and props.  One thing I found bothersome was that while there were many male figures available, there were far fewer female options, and the female options didn’t offer as many poses.  Since ToonDoo doesn’t allow for changing poses beyond flipping the image, this became a problem for me.  I struggled to find exactly what I wanted to convey my message.  Once I found what I wanted, it was easy to dress up the comic and make it my own.  Plus, I had a lot of fun!  Once you are done, saving the ToonDoo is problematic, though.  I expected it to take a little while, but after waiting two hours, I assumed I had broken the site, and I recreated my comic.  After hours more of waiting, that one didn’t upload properly either, so I sent a message requesting help.  When I logged on this morning both were uploaded and available for viewing, but we all know that wouldn’t work well with younger students.  If I were to use this with a class, it would be mandatory to have already taught the students how to use the snipping tool so they could have a saved copy of their ToonDoo in case they run into technical difficulties.

Here is my ToonDoo creation:

Punny Librarian Comic Strip


Pixton

Pixton’s look is definitely geared toward an older crowd.  The characters were fun, posable, and even had a multitude of expressions available.  I had no issue finding what I wanted to create a comic using the Basic (free) options, and I could definitely see myself going back to this site to create other comix.  Saving was quick and easy, which was a relief, and you have immediate options to post to Facebook and Twitter, or to embed your comic.  Upgrading is available on this site, but the Basic options should be enough to work with if you don’t have room in your budget.

Here is my Pixton creation:

No More Bullying Comic Strip


MakeBeliefsComix

This free site was the easiest of all three for me to use, and it was bright and colorful with lots of cute toon characters to choose from.  That said, you definitely get what you pay for; while there are lots of choices for backgrounds and objects, most of the characters are only available in black and white.  The characters they offer show a lot of diversity, even to one character that appears to be ill, and another one in a wheelchair.  There are also several different ethnicities, which I found to be absolutely appealing.  You can’t save your comix here, but they give easy directions for printing and emailing.  I chose to print mine to pdf, and I also emailed it to myself to see what this would look like.  The only problem I had with MakeBeliefsComix, and it was actually a big problem, is that when I went to look at the saving information and then returned to the previous page, my comic strip was gone.  I had to make it all over again.  Since I knew how to navigate the site pretty well at this point, I was able to recreate it within about five minutes, but this could be a huge frustration for students.  I’d suggest having students take screenshots or use the snipping tool before they even attempt to print or do anything else to avoid problems when using this site.

Here is my MakeBeliefsComix creation:

Homophones To Too Two Comic v2


I can see so many applications for using comix in the classroom.  Vocabulary development would be a definite option, as would having students create storyboards for creative writing assignments.  It would be fun to have small groups work together to show plot for books they read in literature circles, and the ideas just keep coming.  As far as ease of use and a miniscule learning curve, I would lean toward using MakeBeliefsComix as my first choice for any comic strip assignment, especially for younger students.  Older students would probably appreciate the details available from Pixton, and it was easily my favorite comic creation site, but with budget considerations being what they often are, you may have to hold off on this one.  Overall, while these sites even the playing field for those of us who can’t draw, they certainly don’t limit those who can, so the possibilities are endless.  Get your creativity on, and go make some comix of your own!

Videos and QR Codes in the Library

YouTube Videos

This week was, not unlike many of the others, full of new activities I had heard about but never created on my own. To start, I viewed videos from several school libraries and got great ideas about how these can be used to promote the library, share instruction beyond the traditional school time and place, and just flat out entertain us.

Norman Library High School Library

There are some really creative people at Norman High School! The video that would help students the most is a tie between “How to Use EBSCOHost” and “Tiger Visits the Norman High Library.” The instructional video is easy to follow, and takes students through everything they need to know to use the EBSCO research database. The tiger mascot visiting the library makes for a great introduction to all the services their library offers, and would be terrific for incoming freshmen and any other students new to campus. As far as the video students would like the best, “Tigerpalooza 2015 Dark Lord Funk” is just a ton of fun, and it has a large number of views. It shows what I assume to be staff members getting together, being creative, and having a lot of fun, and it never hurts to show teachers can be goofy too.

The Unquiet Library

This channel holds a lot of videos, but the most recent are all from three years ago, leaving some of the material here potentially a bit dated. The most useful videos posted for students are about how to find Creative Commons licensed images to use in projects. There are three short videos, “Finding and Using Wikimedia Commons Images,” “Video Tutorial: Finding CC Images Using Compfight,” and “Finding CC Licensed Images in Advanced Flickr Search” that all offer great information.  From views alone, “The Importance of Choice for Igniting Student Passion and Learning through Research Projects” is clearly a favorite. I think students would especially enjoy seeing one of their own peers and her artwork featured here, as well as learning more about how she conceptualized and brought her project to fruition.

Pikesville High School Library

This library takes a different, but really interesting, direction with their YouTube channel. A lot of the videos are picture compilations from activities, and quite a few are also basically public service announcements, such as the fun video “PikesvilleHighschool FAFSA,” which reminds students to sign up for the FAFSA, and is just the fun, silly kind of video students would enjoy watching. There are quite a few videos from the school’s AVID program as well as the counseling office, but I think the most helpful would be the videos such as this one from students now in college who are letting high school students know about the experience.

Bonnie Branch Middle School

This school is full of so much talent, and it is showcased beautifully in this YouTube channel. First off, there are a series of instructional videos for using NoodleTools to create citations and then export them into your Works Cited. Students would definitely find these useful, especially “Noodle Tools – Creating a Book Citation.” I appreciated that the creator made several shorter videos instead of one long one. It is so much easier to go back and review parts you missed that way. After that, there are many videos the students would enjoy, and these blew me away. How do you pick just one when the students have created so many amazing parodies of songs to encourage students to return their overdue books? My personal favorite was the “Taylor Swift Hates Overdue Library Books,” but “I Really Really Want You—Overdue Books Parody” is pretty hilarious as well.

For my own future library, I can definitely see myself creating videos of library tours for the beginning of the year, adding in video compilations of great activities, and reflections from teachers I’ve collaborated with on assignments. The reflection videos seem like a great way to encourage continued, and increased, collaboration.

Book Trailers and QR Codes

The next part of this week’s challenge was to use Animoto to create a book trailer. I have wanted to do this for a long time, but it sounded complicated, so I’ve been shying away from it. Animoto turned out to be super easy to use, and after watching a quick tutorial, I was up and creating on my own. My book of choice was Monster by Walter Dean Myers. I will be showing book trailers to student groups for literature circles, and there are some reluctant readers I know will love this book if I can get them interested. The book trailer should help!

Monster cover

This synopsis from Amazon.com will give you a brief overview of the book:

This New York Times bestselling novel and National Book Award nominee from acclaimed author Walter Dean Myers tells the story of Steve Harmon, a teenage boy in juvenile detention and on trial. Presented as a screenplay of Steve’s own imagination, and peppered with journal entries, the book shows how one single decision can change our whole lives.
Fade In: Interior: Early Morning In Cell Block D, Manhattan Detention Center.
Steve (Voice-Over)
Sometimes I feel like I have walked into the middle of a movie. Maybe I can make my own movie. The film will be the story of my life. No, not my life, but of this experience. I’ll call it what the lady prosecutor called me … Monster.

Scan the QR code below to view the book trailer I created.

qrcode.34339539

http://bit.ly/1MrIobN

As I researched other ideas for using QR codes, I was blown away by the fun, creative ideas librarians have come up with. From QR codes with book trailers and book reviews loaded on bookmarks and shelf talkers, to flyers with promotional materials, uploading QR codes into presentations, and even creating library orientation tours, the possibilities are only limited by your imagination. This site, EduScapes.com, offers a great Seven Steps to Getting Started for using QR codes, and they even link to one of my favorite librarian bloggers, Gwyneth Jones, The Daring Librarian. Her blog post on the topic was incredibly helpful, and gave me fun ideas such as using QR codes to create a QR Quest Scavenger Hunt.
There were many options available on the internet for creating QR codes, and they are designed to fit all types of budgets as well. If you need something more eye-catching and don’t mind paying a monthly fee, you might want to go with Visualead.com for a visual QR code. I decided for now to work with a site that promised free QR codes without a sign-up or account requirement—QRStuff.com.

Instagram, Vine, and Screencasts

This week’s assignment took me phenomenally far out of my comfort zone, landing me in technology areas I have purposely avoided because I thought they would take too much time and effort to master.  Well, thank goodness for letting me dip my toes in the pool and then realizing I knew how to swim all along!

Instagram

I started with Instagram, and found it to be a lot of fun, plus it is easy to see the potential for using this in a classroom setting or for advertising library activities.  I didn’t find it any more difficult to set up or use than any other social media site, to be honest, but the big surprise came a few hours after setting up my account and posting my first two pictures.  I had more people following me on Instagram in a few hours than I did in months of being on Twitter.  Students have been telling me for a year now that no one (meaning teenagers) is on Facebook anymore, but my personal social media saturation point had been reached, and I didn’t want to learn yet another platform.  That standoffish attitude seems a bit silly now.  If I’m hoping to reach students and their parents/guardians, I need to be where they can see me, and this is obviously where they are more likely to be found.  Taking tips from this We are Teachers blog, I plan on using Instagram to showcase fun maker activities in the library, reading recommendations, and author visits.  I can also see collaborating with teachers to find fun ways to spice up a lesson.  For now, my Instagram only has pictures from my brief vacation earlier this week. It was fun to take my picture and put it through a little filtering magic and see what happened.

Vine

I’ve been viewing Vines since they came out, but I hadn’t considered using them in an academic setting at all until now.  Thank goodness for people who think outside the box and are willing to share their ideas!  This TeachThought post shared terrific tips and ideas for using Vine, especially for using it as a marketing tool.  While we can’t always get patrons interested in a longer video, almost anyone will take six seconds out of their day to view something.  And to be honest, who doesn’t let it loop one or two (or more) times to catch all the nuances?  This could be a terrific tool to embed quick tidbits of information or even to show students models of great projects. 

After multiple attempts to get my animals to do something cute and clever yesterday, I finally came up with an idea for a Vine of my own, and decided to show the steps to make a corner bookmark out of an old children’s book.  It was fun, and after a few minutes of trial and error, I had my first Vine posted up for the world to see.

Screencasts

The final part of this challenge made me the most nervous.  Screencasting has always sounded so difficult, and only for the serious tech types.  In my head, the teachers who use screencasts are miles ahead of the rest of us, and I assumed that the technology curve was just too steep for me.  It turns out I was wrong!  I tried out two different screencasting programs: Screencast-o-Matic and Jing. 

Screencast-o-Matic is the only screencasting program I had heard of before, and after playing around with it for a few minutes, I could see why people use it.  The directions are ridiculously easy to follow, and if you do make a mistake, it is simple enough to go back and start again.  The tutorials are easy to follow if you need assistance, and uploading my screencast to YouTube was straightforward.  I didn’t love the fact that my video appears to be a bit blurry, but I’m willing to play around and see if recording a higher resolution video will resolve that issue.  The upgrade price for this program is incredibly competitive at $15 a year, and if you see yourself using the program over several years, you can purchase three years at a time for only $29.  For student use, though, the free product is absolutely functional with one of the only noticeable restrictions being a fifteen minute limit to recordings. 

Jing was entirely new to me, but I found quite a few similarities to Screencast-o-Matic as I began to record with it.  After recording those similarities ended.  TechSmith, Jing’s parent company, has a family of products available, and you must use one of these, Screencast.com, to store your Jing videos and be able to share them.  I hate to admit it, but I got lost for a few minutes while trying to figure out how to share my video, and actually thought I had lost my work.  Fortunately, after watching a couple of tutorials, I was back in business.  Sharing the screencast wasn’t difficult, but you are only allowed to embed a link to the video; Jing doesn’t appear to allow for directly embedding the entire video.  The quality of the Jing recording is much clearer than Screencast-o-Matic, but the free product is limited to five minutes of recording.  Jing is free, but TechSmith offers other upgrade products such as Snagit for longer videos, and the education pricing for this is $29.95 a year. 

While I appreciated the clarity of the Jing video, I think my default program would be Screencast-o-Matic, especially if I were teaching students how to use the program and embed their own videos. 

Below you’ll find my Screencast-o-Matic and Jing screencasts:


Accessing_the_Library_Research_Databases_from_Home

Infographics

I first heard the term infographic last year, and I wasn’t entirely sure what made them so interesting or special.  They’re just a chart of information with graphics added to make it all pretty, right?  Well, turns out I was wrong.  Infographics are an awesome way to create eye-catching reports, charts, and even posters that can be shared digitally or printed out.  They give a visual representation to the key points, and if done right, can be quite engaging.

For this assignment, I perused three different infographic creation sites: easel.ly, infogr.am, and piktochart.com.  Each of these three options offers a free subscription with the opportunity to upgrade for greater access to content.  After that point of similarity, they quickly set themselves apart.  Easel.ly was my first to check out, and I must admit that I found myself immediately confused as to how to begin.  There was no “Start Here!” button, and I was overwhelmed by all the infographics on the front page.  As I scrolled down, they just kept adding and adding.  With no idea of where to go or even how to begin aside from outside tutorials I’d viewed, I decided to move on and find something more to my liking.

Next I looked at Infogr.am.  The clean look to the site with an obvious “Learn” tab at the top of the page was immediately appealing to me.  The price to upgrade if I chose to was a complete turn-off, though.  $19 a month didn’t feel like the special educator pricing I had been promised.  So, cool tutorials or not, this one was going to be a no.  I wanted to land at a site I would enjoy so much that upgrading would be an obvious next step in the future.

Piktochart felt like a nice balance between the two other sites.  There was a short video to watch to get myself going, the educator pricing was $39 a year, and there were several templates right up front to help me begin.  After selecting a template, I found myself moving things around and adjusting the template to my needs within moments.  It wasn’t that different than using something like Glogster, and in many ways, it was actually easier.  The most difficult thing left for me to do was decide what data to include.

The following infographic was created using data from Pew Research Center.  Enjoy!

https://magic.piktochart.com/output/11838496-internet-usage


Blogs and Blog Readers

After reading through descriptions of multiple RSS reader apps, and realizing one of these would make my life easier, I chose to work with Inoreader.  My main reason for this is the ability Inoreader offers for long term content archiving.  I like being able to save interesting tidbits for later consumption, and this app seemed to best fit my needs.  It didn’t hurt that Inoreader is free for its basic services, but if I find myself using it regularly, I can upgrade for approximately $14.99 a year.  Once inside the app, I was able to tinker around and quickly subscribe to blogs and set the interface up for my reading preference (I went with a magazine view).

The following are five blogs I chose to subscribe to as well as descriptions of a couple of useful postings from each.

NeverEndingSearch  http://blogs.slj.com/neverendingsearch/

While searching for good blogs that offered book reviews, I happened across NeverEndingSearch.  It wasn’t actually offering book reviews, but it does have a vast wealth of information for teacher librarians.  Within minutes of pulling up the site, I found myself clicking through posts that were immediately relevant, especially the two shared below:

A Celebration of CC0 Images!  No Rights Reserved

updated Wed Dec 02, 2015 by Joyce Valenza via NeverEndingSearch

This post gave details and links to information about Creative Commons 0 and how it differs from the other levels of Creative Commons licensing.

Book Art with Christina and Ruth

updated on Tue Dec 01, 2015 by Joyce Valenza via NeverEndingSearch

Book art!  Easily the best way to upcycle weeded books from your collection, this post shares a link with information on how to make paper beads and roses as well as instructions for book folding.


Library Displays  http://schoollibrarydisplays.blogspot.com/

If there is one area I feel lacking in, it is my ability to come up with super creative, eye-catching book displays.  This site is chock-full of them!  Not only does Library Displays offer a plethora of ideas, it also links to instructions for creating individual display parts when necessary—an important addition for me.
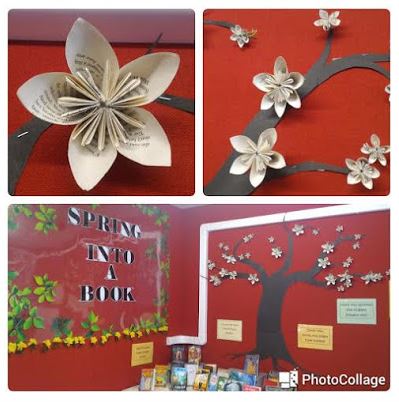
Spring into a Book

updated on Wed Sep 09, 2015 by elaineepp via Library Displays

This particular display wowed me completely!  The creator upcycled weeded books to make blossoms for a spring display.  It was beautiful and eye-catching, plus there was a reminder that “Maker spaces are for librarians to create in too!”
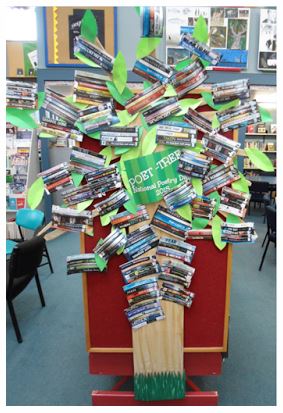
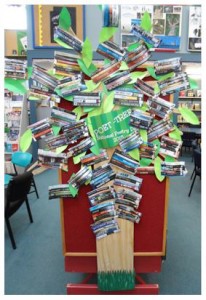
Lib Display Origami flowers

Poet-Tree

To produce this display students created spine poetry, photocopied their poems, and used the resulting pictures to make the foliage of their tree.  Definitely saving this idea for Poetry Month!

Lib Display Poet-tree


The Adventures of Library Girl  http://www.librarygirl.net/

I just learned of Library Girl this last week from a fellow SHSU student, and after hearing her glowing description, I had to check out Library Girl for myself.  I’m glad I did!  The blog posts I have read so far delve deeply into subjects I feel passionate about, and it is obvious I’ll be learning a lot from this blogger.

Just Read. And Let Them Just Listen: The Case for Reading Aloud to Students of All Ages

updated on Sun Aug 02, 2015 by Jennifer LaGarde via The Adventures of Library Girl

LaGarde writes about the importance of reading aloud to students of all ages, and she creates a solid argument for reading aloud as a sound instructional practice.

Six Tips for Building Book Displays That Matter

updated on Wed Nov 04, 2015 by Jennifer LaGarde via The Adventures of Library Girl

The blurb for this post made it sound like I’d learn how to build beautiful displays that would draw in crowds of students, but it turned out to be much more.  The concept here is to remember we can use library displays to both communicate ideas and connect with the students who need us most.  Definitely a worthy read, plus it links to examples of the displays she is encouraging us to build.


The Unquiet Librarian  https://theunquietlibrarian.wordpress.com/

This blog has a serious, scholarly feel to it, much more so than most blogs I have looked over, but it has also been the most directly useful.  The Unquiet Librarian also makes sure to include lots of pictures and videos so the work can be followed easily.

Musical Book Tasting+Padlet: A Recipe for Participation Feb 2015

by The Unquiet Librarian via The Unquiet Librarian

This particular post has exactly what I need to put the final touches on a collaborative lesson I’ve been working on.  Hurray!

Sean O’Connor Rocks the Write-Around for Collaborative Student Thinking as Part of Presearch and Topic Development with Literary Research

by The Unquiet Librarian via The Unquiet Librarian

Yet another incredibly useful and timely post from the Unquiet Librarian, this piece describes an innovative approach to the pre-search process with students beginning a literary research paper.  I was just talking about this subject with a pre-AP teacher on my campus, and she was describing the difficulty of approaching this type of research paper with her freshmen.  The pictures and videos Unquiet Librarian shared throughout the entire process could go a long way toward improving the outcome for my pre-AP teacher’s students.


The Daring Librarian  http://www.thedaringlibrarian.com/

I already knew of Gwyneth Jones, aka The Daring Librarian, from Twitter, and I’d looked into some of her edtech blogs, especially the ones about Maker spaces, but there is a lot more to her blog than I had suspected.  Most of the topics are fun and lighthearted, but even the post about branding yourself has some deep moments that made me think about the why of creating a brand as well as the how of it.  Subscribe to her for fun posts about bringing Amazon’s Echo (Alexa) into the library, as well as more serious subjects like the “Wonder More—Fear Less” included below.

Flocabulary: Hip-Hop Learning That is Out of this World! Sep 2015

updated on Tue Sep 08, 2015 by @GwynethJones – The Daring Librarian via The Daring Librarian

Jones’ Flocabulary post is so much fun to read that I had to go check this site out for myself.  I had heard of Flocabulary’s hip-hop approach to several subject areas, but I learned a lot more about other content they offer such as The Week in Rap, fill in the blanks, quizzes, and printable activities to complete with students.  This is just the sort of information I will need to make wise purchasing decisions for my future campus.

Wonder More – Fear Less

updated on Tue Jul 28, 2015 by @GwynethJones – The Daring Librarian via The Daring Librarian

This post should be required reading for all educators, and a huge chunk of it would work for our students as well.  It is mainly about being willing to try new things and accept the possibility that we may fail, but there is so much learning to be had from failing well.  My favorite quote from the post has to be, “Change feels uncomfortable, if you’re not slightly scared, you’re not trying hard enough.”


Tumblr

Another new thing I explored during the course of this assignment was Tumblr.  I don’t have much posted there yet, but here is the URL to my Tumblr blog: andriaamodtho.tumblr.com.

Facebook and Twitter, Venturing into Social Media

Facebook and Twitter

Moving into the Digital Age alongside our Digital Natives

As I read through the Andrew Churches’ “Bloom’s Digital Taxonomy,” clicked my way through “Kathy Schrock’s Guide to Everything,” viewed Marc Prensky’s “Digital Natives,” and alternately guffawed and groaned through the Beloit College “2019 List,” I found myself becoming increasingly (and sometimes uncomfortably) aware of the differences between myself and the students I teach.  Prensky was absolutely correct in pointing out that students are not the little “usses” we were trained to teach.  There are fundamental differences in how educators and young people use and view technology.  For us, technology is frequently a tool, and for our students, their technology is a direct extension of themselves.  But then, as an educator, I tend to view most everything as a tool to be used in learning—that comes part and parcel with the job.

  1. Is it necessary to break technology down in this way?

I’m not sure necessary is the term I would use—maybe useful is more appropriate.  I am definitely a “digital immigrant,” but that doesn’t mean I am completely unfamiliar with the digital landscape.  Still, it often feels as if I get control of one new app or tool only to find out it was last year’s hot thing, and the digital natives have already moved on.  Their technological attention span is almost exactly as long as the gap between new advances, and I can’t pause to rest if I hope to keep up.  Breaking down technology and its teaching as thoroughly as Bloom’s Digital Taxonomy and Kathy Schrock’s Guide to Everything makes it feel manageable and even sharable.  This sharable aspect is important for collaboration with other teachers.

  1. How does this help explain or reframe technology in the classroom?

Teachers used to get high points on their PDAS evaluations for pulling out an ELMO or showing a PowerPoint.  We know that is no longer the case.  While these tools help in teaching, they are still part of the lecturing Prensky points out that we need to avoid; they are definitely lower on Bloom’s Digital Taxonomy.  Unfortunately, we don’t always know how to elevate our teaching practices, and consequently our students, up to those higher levels where they can analyze, evaluate and create.  Where Churches’ writing explains for us in simple terms, and his rubrics show us the way, Kathy Schrock’s work on her site hands us not only the ideas for tools, but the specific areas with links to the tools that can be used to reach the appropriate Bloom’s level.

  1. If you had to explain why a certain app was necessary for your library, how would you frame the request in terms of the Digital Taxonomy or Prensky’s views?

It is important to remember here that our administration is not yet made up of digital natives (although in the coming decade, they might just be!), but they do know and understand the need to elevate educational practices to the higher levels of Bloom’s Taxonomy.  The Digital Taxonomy’s use of active verbs to show what students will be doing is an absolute help to us here.  I could actually see myself sharing the Digital Taxonomy pyramid within a chart or infographic showing how a particular app would help us to reach the upper levels while incorporating or building upon the lower ones.

  1. Do you think there is a difference? What is it?

Looking at this through Prensky’s lens, you can definitely see a difference in how educators and students view the use of technology.  If we are going to truly allow students the growth opportunity of reaching the top levels of evaluating and creating, we have to get out of their way and let them show us what they can do.  Any teacher can give an assignment with a technological aspect, but the real teaching in this digital age is going to come from the students who are turned loose to work and learn either on their own or within a group of collaborators.   In my own classroom I’ve been able to witness this personally as students given the opportunity to move beyond the confines of the given assignment have created beautiful representations to share with the class.

  1. Do you feel technology is a tool for learning or the foundation upon which we build learning?

Is there a reason it can’t be both?  While I accept fully that our students are digital natives, that does not mean they are all comfortable within that role.  For instance, young people may not typically be far from their phone, but that does not mean they automatically know how to use it to gain information.  I’m often able to facilitate their learning, showing them how to download tools like Google Classroom or Padlet, and they are amazed to learn they can work on their assignments from nearly anywhere they can connect to Wi-Fi.

  1. Why would a librarian care about any of this?

There are so many reasons librarians should care about this topic, but I can’t help thinking that it goes beyond the fact that school librarians are not just the keeper of books on a campus.  The librarian should be the first person a teacher thinks of when they hear of a new app and want to try it out in their classroom.  The librarian should be the first person teachers think to go to when they need a new way to engage their students.  And considering we spend far more time working directly with students than we do with individual teachers, the students on campus should also think of us first when they are trying out something new and don’t fully know how to make it work.  We should be the problem solvers and the people narrowing the gap for those who don’t have ready access to technology at home.  Librarians recognize the fact that students who come from lower socio-economic backgrounds don’t use their technology the same way as students who have had constant access since they were toddlers, and we need to be there to show these students the way.  They may all be digital natives, but that doesn’t mean students all come with the same roadmap and guides to help them.  We get to be the guide if necessary, and when it isn’t necessary, we get to be the best cheerleader.

1 2 3 5